In the latest release of Laravel, they recommended Jetstream to make application scaffolding but as we used laravel UI in our previous laravel applications so we may want to use the same thing in further projects as well.
But Laravel 8 recommends Jetstream and in the initial days of laravel 8 release, they also mentioned that Laravel UI will not support anymore for Laravel 8 but after a lot of discussions and comments by Laravel Community the Laravel UI started support to Laravel 8. But we should play the safer side and maybe in Laravel 9 or 10 they again stopped support for Laravel UI so we should use something latest and officially recommended things.
Here comes Jetstream(Laravel Jetstream is a beautifully designed application scaffolding for Laravel. Jetstream provides the perfect starting point for your next Laravel application and includes login, registration, email verification, two-factor authentication, session management, API support via Laravel Sanctum, and optional team management.) but there is a problem with it for beginners or some developers because it comes with two types of scaffolding one is Livewire and another one is Vue. So who don’t want to learn or implement any new stack then what they do? So Fortify comes in the role and it’s also provided by Jetstream officially.
Laravel Fortify is a frontend agnostic authentication backend for Laravel. Fortify powers the registration, authentication, and two-factor authentication features of Laravel Jetstream.
You may use Fortify (without Jetstream) to serve a headless authentication backend for your Laravel application. And can use your custom UI whatever you want or will show here to use Auth UI provided by Laravel UI.
So here we show how to use Fortify in our new applications based on Laravel 8.
To get started, install Fortify using Composer:
composer require laravel/fortify
Next, publish Fortify’s resources:
php artisan vendor:publish --provider="Laravel\Fortify\FortifyServiceProvider"
Next, Connect with fresh DB and migrate your database:
php artisan migrate
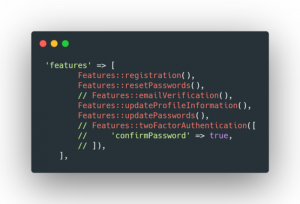
Fortify Setup is done now we have to enable Fortify features from the file fortify.php(config/fortify.php). The fortify configuration file contains a features configuration array.
We can easily comment or uncomment features as per our project’s requirements.

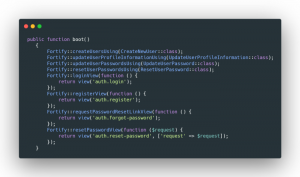
To get started, we need to instruct Fortify on how to return our login view. Remember, Fortify is a headless authentication library. All of the authentication view’s rendering logic may be customized using the appropriate methods available via the Laravel\Fortify\Fortify class. Typically, you should call this method from the boot method of your FortifyServiceProvider (app\Providers\FortifyServiceProvider.php)
Fortify will take care of generating the /login route that returns this view. Your login template should include a form that makes a POST request to /login. The /login action expects a string email address / username and a password. The name of the email/username field should match the username value of the fortify configuration file.
So we have done backend setup in Fortify now we can use our custom UI that’s under our project’s theme But if we want to use laravel UI’s Auth Screens as we mentioned above so we have to do a simple thing and need to generate a fresh laravel project and install laravel UI. And take copy auth & layouts folders from resources/views and paste in your new project’s directory and run your project in the browser you will get the same login & signup screens as you get in laravel UI scaffolding.
This is the basics of Fortify to use in your Laravel Projects, but you should go deeper by exploring official docs.
https://jetstream.laravel.com/1.x/features/authentication.html#laravel-fortify
